Build a Glowing Arcade Romance Book Nook Insert
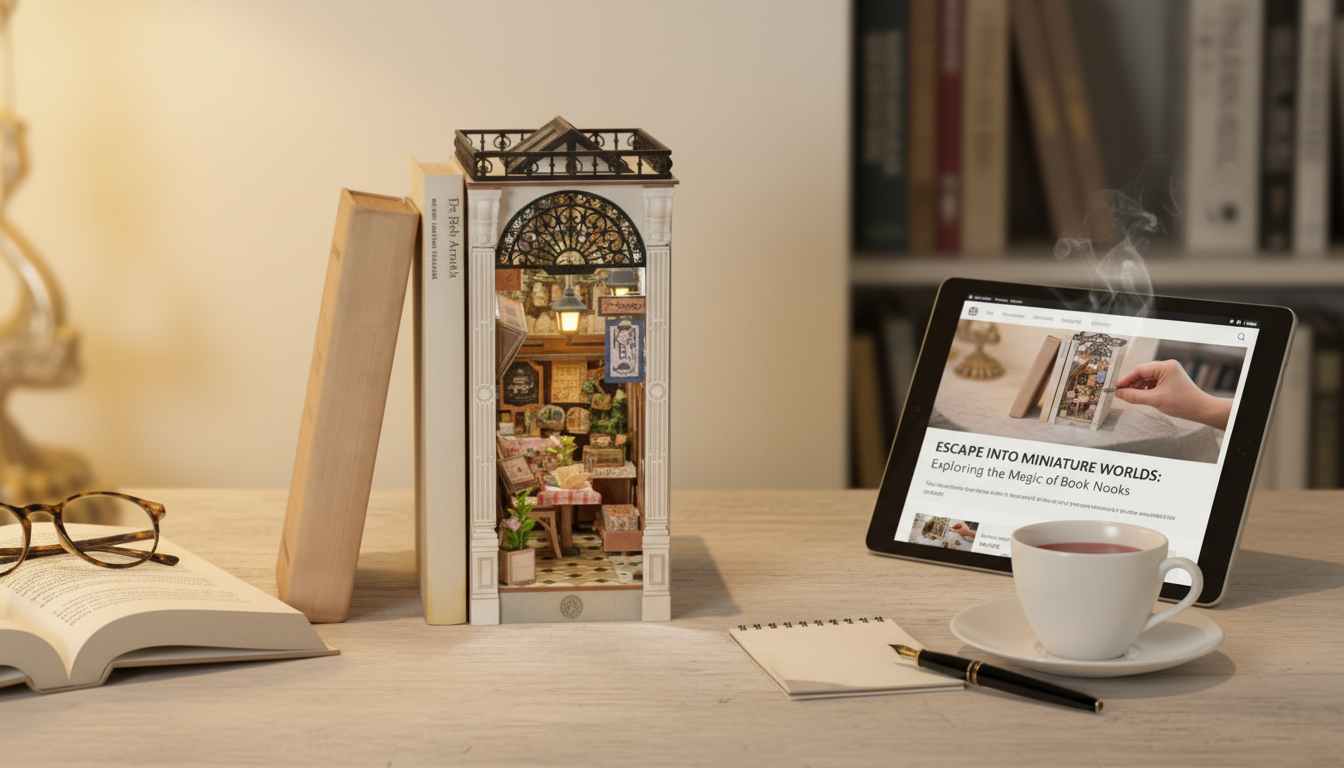
Arcade Romance Book Nook DIY Wooden Shelf Insert with Lights
Turn an ordinary bookshelf into a tiny, glowing arcade scene with this DIY wooden book nook insert. Designed to slide between books like a miniature diorama, the Arcade Romance theme pairs nostalgic game-room details with warm lighting for a cozy display that feels custom-made once assembled. For more guidance, see thirtyyearsinwas00logan_djvu.txt – University of Illinois Library.
What this book nook adds to a shelf
- Creates a “window” effect between books, adding depth and a focal point to a bookcase or display shelf.
- Arcade-inspired details give a playful, nostalgic look that fits reading corners, gaming rooms, and creative workspaces.
- Integrated lights highlight the miniature scene at night and make the insert stand out even in dim rooms.
- A hands-on build that feels like a craft project and a collectible display piece in one.
For a ready-to-build option with lighting included, see the Arcade Romance Book Nook DIY Wooden Shelf Insert with Lights. For further reading, see Reviews by Lance Cirone – The Interactive Fiction Database.
At-a-glance details
- DIY wooden shelf insert kit with an illuminated interior scene.
- Best suited for standard bookshelves where it can sit flush between books for a clean, built-in look.
- Ideal as decor for readers, crafters, miniature lovers, and anyone who enjoys arcade aesthetics.
| Feature | What to expect |
|---|---|
| Build type | DIY assembly (miniature wooden insert) |
| Lighting | Built-in lights for interior glow |
| Placement | Fits between books on a shelf or as a standalone display |
| Skill level | Beginner-friendly with patience; easier with basic craft tools |
| Giftability | Great for birthdays, holidays, and creative hobby gifts |
What typically comes in the kit (and what to have ready)
- Pre-cut wooden pieces that form the walls, floor, facade, and layered scene elements.
- Lighting components designed to illuminate the interior without overpowering the miniature details.
- Decorative printed pieces (such as signage, panels, or scene accents) that bring the arcade theme to life.
- Recommended to have on hand: craft glue, tweezers, small scissors or a hobby knife, a ruler, and a soft cloth for cleanup.
A small setup upgrade can make the build feel smoother: a desk lamp aimed from the side (to reveal edges and alignment) and a tray or shallow box lid to keep tiny parts corralled.
Time, difficulty, and build setup
- Plan for an unhurried build session; splitting the project into stages helps keep alignment clean and reduces mistakes.
- Work on a flat surface with good lighting; a tray or mat helps prevent tiny parts from getting lost.
- Dry-fit key pieces before gluing to confirm orientation and avoid misalignment.
- Keep glue minimal and controlled; excess glue can cloud clear parts or leave shiny marks on printed details.
Patience pays off most when you’re squaring the shell. If the base and sides are perfectly aligned early, the later decorative layers tend to “click” into place with less fuss.
Assembly flow that keeps everything aligned
- Stage 1: Sort parts by type (structural panels, decorative layers, lighting). Confirm all pieces are present before starting.
- Stage 2: Build the main shell (base, sides, back) and let it cure fully so the frame stays square.
- Stage 3: Add layered interior details from back to front. This prevents hard-to-reach glue spots later.
- Stage 4: Install lighting with neat cable routing so wires don’t bulge against the walls or block scene elements.
- Stage 5: Finish the facade and top, then test the light again before final closure.
If any piece feels slightly tight, avoid forcing it. Light sanding on an edge or a second dry-fit often solves the problem without stressing the frame.
Lighting tips for a clean, warm glow
- Test the lights early and again before final assembly to avoid reopening the shell later.
- Aim lighting away from direct sightlines to reduce glare and hotspots; reflected light often looks more “cinematic.”
- If the glow feels too bright, a thin diffuser (like tracing paper placed safely away from heat sources) can soften the effect.
- Keep any battery or power access points reachable so turning the lights on doesn’t require removing the entire insert.
Even though decorative LED components are typically low-heat, it’s smart to follow basic safety habits: avoid pinched wires and keep the nook away from clutter that could press on connections. For general guidance, review NFPA electrical safety tips and UL safety tips for decorative lighting.
Styling, placement, and shelf-fit ideas
- Place between similarly tall books to create a seamless “street scene” illusion framed by spines.
- Use darker-spined books on both sides to emphasize the interior lighting and add contrast.
- For a gaming-themed nook, pair it with art books, retro game guides, or graphic novels to match the arcade vibe.
- If displaying standalone, position it against a wall or bookend so the insert remains upright and stable.
For a cohesive desk-or-shelf setup, coordinate the nook’s glow with other RGB or lit accessories. If your space doubles as a streaming or gaming corner, the RGB USB Condenser Microphone for Streaming, Recording, Gaming & Studio can match the arcade mood while keeping your audio setup looking intentional.
Care, longevity, and troubleshooting
FAQ
Does it come fully assembled?
It’s a DIY kit that requires assembly. Expect pre-cut wooden parts and lighting components that you put together step by step.
How long does assembly usually take?
Time varies by experience and pace. Many builders finish in one long session or split it across a couple of evenings for cleaner alignment and easier glue-curing.
Are the lights safe to leave on for long periods?
Follow the included instructions and use the intended power method. Decorative LED lighting is typically low-heat, but it’s best practice to turn lights off when unattended and keep wiring unpinched.


Leave a comment